If you’ve spent time in Tableau, you know how satisfying the Show/Hide Container button is. Click a button, a panel slides away; click again, it comes back. It’s clean, it saves real estate, and users love it. When you move to Power BI, that feature isn’t there by default — but you can get surprisingly close using Bookmarks combined with Selection Pane visibility toggles. This post walks through exactly how.
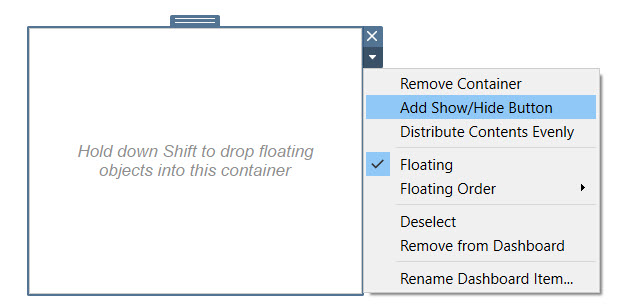
What Tableau’s Show/Hide Container Does
In Tableau, a Layout Container can be configured with a Show/Hide button. The entire container — and everything inside it — collapses or expands with one click. Common uses include:
- Collapsible filter panels
- Toggleable legend or detail cards
- “Advanced options” drawers that stay hidden until needed
The visual result is a report that feels interactive and uncluttered.
The Power BI Equivalent: Bookmarks + Selection Pane
Power BI doesn’t have a native container concept with a toggle button. What it does have is:
- Bookmarks — snapshots of a report’s state (visuals visible, filters applied, slicers selected, etc.)
- Selection Pane — lets you show/hide individual visuals
- Buttons — can be assigned bookmark actions
The pattern is simple: create two bookmarks (one with the panel visible, one with it hidden), then wire a button to flip between them.
Step-by-Step Setup
Step 1: Build Your “Panel” Visuals
Group together whatever you want to show/hide — slicers, cards, a filter list, or a text block. These don’t need to be in a formal container; they just need to exist on the canvas.
For clarity, name each visual descriptively in the Selection Pane (View → Selection). For example:
FilterPanel_BackgroundFilterPanel_DateSlicerFilterPanel_CategorySlicerFilterPanel_Header
Naming them with a shared prefix makes bulk selection easy.
Step 2: Create a “Panel Visible” Bookmark
- Make sure all your panel visuals are visible (eye icon on in the Selection Pane).
- Go to View → Bookmarks Pane.
- Click Add and name the bookmark
Panel_Open. - Right-click the bookmark → Update to lock in the current state.
Important: By default, bookmarks capture all report state — filters, slicers, page, and visual visibility. To isolate your toggle to just visibility, right-click the bookmark → Data unchecked, Display checked, Current Page checked. This prevents the bookmark from also resetting slicer selections when the user clicks it.
Step 3: Create a “Panel Hidden” Bookmark
- In the Selection Pane, click the eye icon next to each of your panel visuals to hide them.
- In the Bookmarks Pane, click Add and name it
Panel_Closed. - Right-click → set it to Display only (same settings as above).
You now have two bookmarks representing the two states.
Step 4: Add Toggle Buttons
You need two buttons — one visible in each state — so the label can change to reflect what the click will do (e.g., “▶ Show Filters” vs. “◀ Hide Filters”). This is what makes it feel like a true toggle rather than a one-way action.
Button A — “Show Filters” (visible when panel is closed):
- Insert → Button → Blank (or a shape).
- Label it
▶ Show Filters. - In the Format pane, go to Action → Type: Bookmark → Bookmark:
Panel_Open. - Name this button
Btn_ShowFiltersin the Selection Pane.
Button B — “Hide Filters” (visible when panel is open):
- Insert another button.
- Label it
◀ Hide Filters. - Action → Bookmark:
Panel_Closed. - Name it
Btn_HideFilters.
Step 5: Include the Buttons in the Bookmarks
This is the key step most guides miss. The buttons themselves need to swap visibility, otherwise both buttons show at the same time.
- Go back to the
Panel_Openbookmark. Make sureBtn_ShowFiltersis hidden andBtn_HideFiltersis visible, then Update the bookmark. - Go to the
Panel_Closedbookmark. Make sureBtn_ShowFiltersis visible andBtn_HideFiltersis hidden, then Update the bookmark.
Now clicking either button swaps both the panel and the button label in a single action.
Step 6: Set the Default State
Whichever state you want the report to open in, set that bookmark as your default page state. You can do this by navigating to the desired bookmark, then saving the .pbix in that view. Power BI will open to whatever state is active when you save.
Visual Layout Tip: Use a Rectangle as a Background
To replicate the feel of Tableau’s container — where collapsing the panel leaves a clean edge — add a Rectangle shape behind your panel visuals with a fill color. Include it in both bookmarks’ visibility state. When the panel hides, the background disappears with it, leaving no ghost space on the canvas.
For a more polished effect, layer visuals like this (bottom to top in the Selection Pane):
FilterPanel_Background(rectangle)FilterPanel_Header- Slicers and filters
Btn_HideFilters(on top, inside the panel area)
And separately, float Btn_ShowFilters at the edge of where the panel lives so users always know where to click to bring it back.
Handling the “Ctrl+Click” Requirement in Edit Mode
One gotcha: in Edit mode, clicking a button with a bookmark action requires Ctrl+Click. In Reading view (or published reports), a plain click works. Remind your report consumers of this if they’re testing in the desktop app.
Limitations vs. Tableau
Being honest about the gaps:
| Feature | Tableau | Power BI |
|---|---|---|
| Native container collapse | Built-in | Manual bookmark setup |
| Smooth animation | Yes | No (instant snap) |
| Works on all device sizes | Yes, adapts | Requires separate mobile layout |
| Affects layout reflow | Yes (other visuals shift) | No (visuals stay fixed; panel hides in-place) |
The biggest difference is layout reflow: in Tableau, hiding a container causes surrounding content to shift and fill the space. In Power BI, the space just goes blank — visuals are fixed-position. If you want the main content area to “expand” when the filter panel hides, you need to design two separate full-canvas layouts and use bookmarks to swap the entire arrangement, which is more work but absolutely achievable.
When to Use This Pattern
This technique works well for:
- Collapsible filter panels — the single most common use case
- Detail-on-demand cards — show a KPI breakdown only when the user asks
- Help/legend overlays — a “?” button reveals explanatory text
- Tabbed navigation — bookmarks can simulate tab switching by showing/hiding entire page sections
Quick Reference Checklist
- Name all panel visuals clearly in the Selection Pane
- Create
Panel_Openbookmark — panel visible, Hide button visible, Show button hidden — Display only - Create
Panel_Closedbookmark — panel hidden, Show button visible, Hide button hidden — Display only - Assign
Panel_Openaction to the Show button - Assign
Panel_Closedaction to the Hide button - Save the file in your preferred default state
- Test in Reading view (not Edit mode)
Wrapping Up
Tableau’s Show/Hide Container is one of those features that feels deceptively simple but takes real thought to replicate elsewhere. In Power BI, bookmarks give you the mechanism — you just have to build the logic yourself. Once you’ve done it once, the pattern becomes second nature, and the result is a report that feels just as interactive and polished as anything you’d build in Tableau.
The extra setup is worth it. Your users will never know the difference.

Leave a comment